(Discover many other contents on: NOWO.ONE and NOWO Publishing)
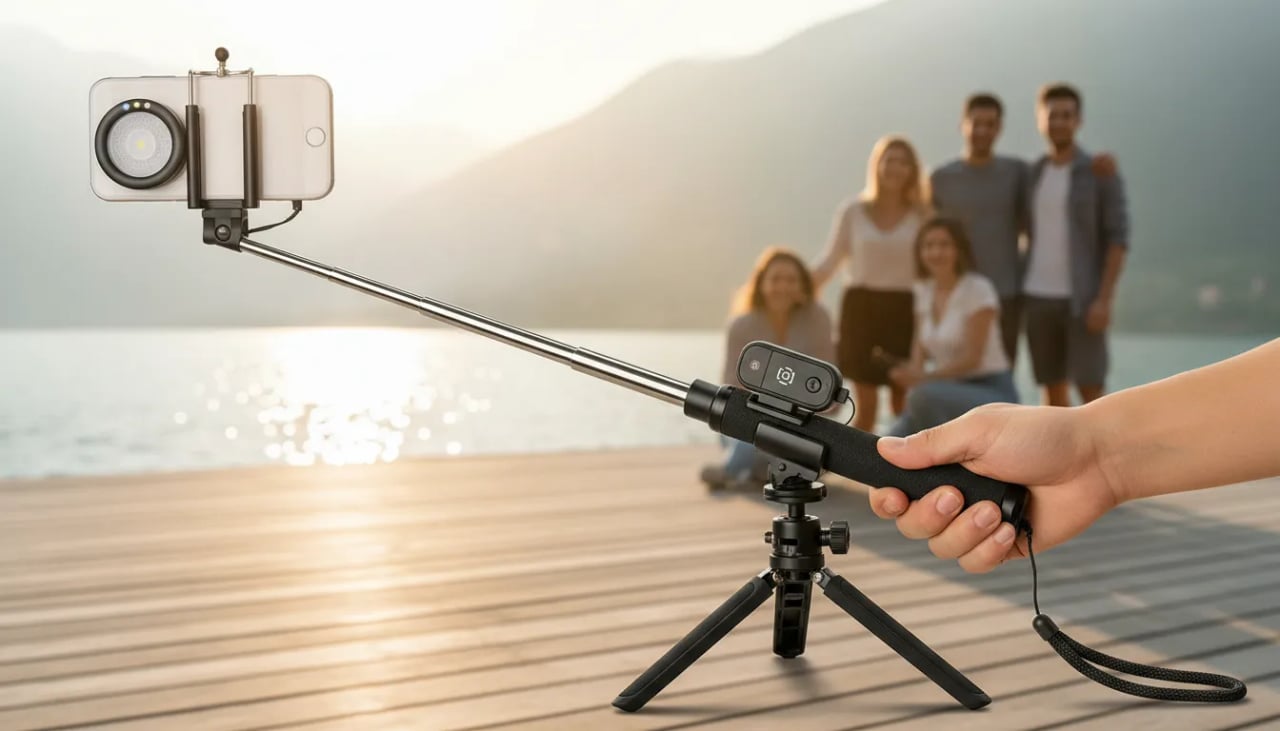
You know the moment: the view is perfect, everyone’s finally in place, and your arm still isn’t long enough. That’s where a well-designed selfie stick earns its spot in your day bag—especially when you want wider angles, steadier video, and hands-free shooting with a click.
Did You Know?
A Bluetooth selfie-remote can trigger your phone’s camera without touching the screen—helping you avoid camera shake and making it easier to frame group shots from a distance.
Source: General smartphone photography best practice
Practical and versatile selfie stick, perfect for taking photos and recording videos on any occasion. Featuring an adjustable telescopic pole, it provides extended reach to capture the perfect angles and include more people in your shots. The smartphone holder is universal and compatible with most devices. With its integrated or detachable Bluetooth remote, you can easily take pictures from a distance. Lightweight and compact, it’s ideal for travel, events, and outdoor activities.
I’ll walk through key specs to look for, setup tips for iPhone and Samsung Galaxy, and real-world shooting techniques for trips, parties, and hikes.
Key features and specs
Practical and versatile selfie stick, perfect for taking photos and recording videos on any occasion. Featuring an adjustable telescopic pole, it provides extended reach to capture the perfect angles and include more people in your shots. The smartphone holder is universal and compatible with most devices. With its integrated or detachable Bluetooth remote, you can easily take pictures from a distance. Lightweight and compact, it’s ideal for travel, events, and outdoor activities.
When I’m comparing selfie sticks, I focus on a handful of specs that directly affect framing, stability, and whether I’ll actually carry it. The “best” one is usually the one that balances packability with enough reach to look flattering and fit everyone into the shot.
Adjustable telescopic pole (reach vs. pack size)
Look for a short collapsed length for easy packing and a long extended reach for wider group shots and better angles.
Universal phone holder (grip range + stability)
A spring-loaded clamp with soft pads should fit most phones (with slim cases) and keep them centered without wobble.
Bluetooth shutter remote (integrated or detachable)
A built-in remote is harder to lose; a detachable remote is easier to use for tripod-style shots and group photos.
Remote range + battery convenience
Typical Bluetooth range is best within a few meters; check whether it charges via USB or uses a coin cell you can swap mid-trip.
Lightweight, compact build (true portability)
Compare weight and folded length—these two numbers decide whether you’ll actually carry it all day.
Materials + maximum load capacity
Aluminum alloy poles resist flex; reinforced plastic phone mounts reduce cracking. Confirm the max supported weight for larger phones.
Adjustable telescopic pole: collapsed vs. extended
The telescopic pole is the core spec because it controls both portability and perspective. I check the folded length first—if it won’t fit in my day bag, I’ll leave it behind. Then I check extended reach: longer reach helps reduce “big forehead” distortion and makes it easier to include more of the background or a whole group.
Universal smartphone holder: compatibility and grip
A “universal” phone mount should handle common devices like iPhone and Samsung Galaxy sizes, ideally even with a slim case. I look for rubberized pads and a firm spring so the phone doesn’t creep downward mid-video. A stable clamp plus a solid joint (tilt/rotation) matters more than fancy features if I’m recording steady clips.
Bluetooth remote: integrated vs. detachable (range + battery)
A Bluetooth shutter remote is what turns a selfie stick into a true group-photo tool. Integrated remotes stay with the stick, while detachable remotes are easier to hold when I’m using the stick like a mini monopod or placing it against a surface. For range, I assume best performance when I’m close (a few meters), and I consider battery logistics: USB-rechargeable is convenient at home, while a coin-cell remote can be swapped quickly during travel.
Materials, max load, and real portability
For materials, aluminum alloy poles typically flex less than thin plastic, and reinforced ABS in the phone mount helps resist cracks. Max load capacity matters if I’m using a larger phone or adding accessories; a heavier device can cause sagging and shake. Finally, I sanity-check portability metrics—weight, folded length, and extended reach—because those three numbers predict whether the stick will feel effortless all day or annoyingly bulky.
How to use it: setup and shooting techniques
Getting a selfie stick dialed in is mostly about two things: a secure phone mount and repeatable shooting habits. Once those are set, your photos look intentional instead of “arm’s-length.” Keep your iPhone or Android case on if it fits the clamp comfortably, but remove bulky wallet cases that can shift.
Unboxing + quick setup (the “won’t slip” routine)
Start by extending the telescopic sections only as far as you need; longer reach increases wobble. Open the spring-loaded phone clamp (or screw clamp, depending on the model), seat your phone centered, then tighten until the phone doesn’t creep when you gently twist it.
Before you raise the stick, do a quick safety check: tug the phone upward and downward lightly to confirm the grip. If your stick has a rotating head, lock the tilt/rotation joint so it doesn’t sag mid-shot.
Fast Setup + Better Shots (30-second checklist)
Use this mini checklist each time you pull out your selfie stick so you spend less time fiddling and more time capturing sharp, flattering photos and steady video.
- ✓ Extend, lock, and level: open the clamp, center your phone, and tighten until it won’t slip.
- ✓ Pair the Bluetooth remote once; then use it for burst/group shots and shake-free video starts.
- ✓ Angle for flattering framing: camera slightly above eye level, chin forward, shoulders turned, clean background.
Pairing and using the Bluetooth remote (integrated or detachable)
If your stick includes an integrated handle remote or a detachable “clicker,” pair it once and you’ll rarely need to think about it again. Turn on the remote (often a long-press), then on your phone go to Settings > Bluetooth and connect to the device name shown (common names include “Selfie Remote,” “AB Shutter3,” or the brand name).
Test it inside the Camera app first, then in your preferred apps like Instagram, TikTok, or the iOS/Android camera. The remote is most useful for reducing shake: start video recording without tapping the screen, fire burst shots for groups, and trigger photos while holding a steady pose.
Framing, composition, and flattering angles
For selfies, keep the camera slightly above eye level and angle down a few degrees; it sharpens the jawline and opens the eyes. Extend the stick just enough to fit your shoulders and some background, then rotate your body 20–30 degrees instead of facing the lens straight on.
Use your phone’s grid (enable “Grid” in iPhone Camera settings or “Grid lines” on Android) and place your eyes near the top third line. If you’re using a wide lens (0.5x/ultra-wide), keep faces closer to the center to avoid edge distortion.
Group shots, panoramas, and video recording
For groups, raise the stick higher than you think—slightly above head height—and tilt down so everyone’s face is visible and the background looks intentional. Ask the tallest person to stand slightly behind, then use burst mode or a 3–10 second timer plus the Bluetooth remote so no one is mid-blink.
For panoramas, move your body, not your wrists. Keep elbows tucked and rotate from your torso like you’re on a slow swivel chair; a smooth, level sweep stitches cleaner in iOS Panorama or Google Camera’s panorama mode.
For video, stability beats reach. Shorten the stick, hold it with two hands, and use gentle “start/stop” presses on the remote. If you film vertical for Reels/TikTok, keep the horizon level and let subjects move through the frame rather than constantly panning.
Stability techniques: tripod base, stance, and motion control
If your model has a tripod base, spread the legs fully and press them firmly into the surface. Place the phone so the center of mass sits over the tripod—avoid extreme side tilt—and add weight (like a small bag) near the base outdoors to reduce wind wobble.
Handheld, treat the stick like a mini gimbal: keep elbows close to your ribs, take a half step wider stance, and walk heel-to-toe for smoother motion. For the cleanest “moving selfie,” use 0.5x cautiously, keep your face centered, and make slower turns than you think you need.
Comparing selfie stick types and when to choose them
The “best” selfie stick is the one that fits how I actually shoot: quick snapshots, group photos, travel clips, or steady solo video. The big differences come down to how the shutter triggers, how the remote is handled, and whether the body prioritizes pocketability or stability.
Pick your trigger: Bluetooth or wired
Choose Bluetooth (e.g., DJI OM Fill Light Phone Clamp, Insta360 Invisible Selfie Stick + Bluetooth remote) for clean framing and distance shots; choose wired 3.5mm (e.g., UBeesize wired models) when you want zero charging and simple setup (if your phone still supports it).
Decide on remote style
Integrated remotes are grab-and-go (e.g., AnkerMake selfie stick/remote combos), while detachable remotes (e.g., UBeesize tripod sticks with removable shutter) are easier to replace if lost and can sit in your hand for group photos.
Choose your body: pocket foldable or tripod-base
Pocket sticks (e.g., Xiaomi Mi Selfie Stick Tripod compact style) disappear in a day bag; tripod-base sticks (e.g., UBeesize Tripod Selfie Stick, JOBY GripTight PRO TelePod) stand steady for video calls, time-lapses, and solo content.
Match features to your main use
For travel: light + quick deploy; for events: detachable remote + wider clamp; for creators: tripod stability, tilt range, and accessory mounts (cold shoe/1/4-20).
Set your budget priorities
Spend more for stability and build (JOBY, DJI) or keep it simple for casual use; pay for features you’ll actually use—tripod legs, extension length, and remote reliability beat flashy add-ons.
Bluetooth vs wired: what I gain (and what I babysit)
Bluetooth models are the modern default because they work with most phones and let me trigger shots from a few steps away—perfect for group photos and solo framing. The downside is battery and pairing: I have to remember to charge the remote and occasionally re-pair it after switching devices.
Wired selfie sticks (3.5mm headphone jack shutter) can be wonderfully simple—no charging, no Bluetooth menus—if my phone still has a headphone port or I’m willing to use a dongle. If I’m on an iPhone without a jack, Bluetooth is usually less hassle than keeping adapters in my pocket.
Integrated remote vs detachable remote: convenience vs replaceability
An integrated remote is harder to lose and faster for casual “stop and snap” use. But if that remote stops holding a charge, the whole stick can feel compromised.
Detachable remotes—common on tripod sticks like the UBeesize Tripod Selfie Stick—are more flexible. I can place the phone on a table/tripod, hold the remote naturally, and if I lose it, replacing a small shutter remote is easier than replacing the entire rig.
Pocket foldables vs tripod-base sticks: portability vs stability
For daily carry, compact options like the Xiaomi Mi Selfie Stick Tripod-style form factor win because they slide into a small sling. They’re great for sightseeing clips and quick café photos, but lightweight legs can wobble in wind.
For steadier video, a heavier-duty tripod-base stick like the JOBY GripTight PRO TelePod is the better pick. I reach for this style when I care about stable framing—video calls, time-lapses, or hands-free recording.
Side-by-side comparison of common options
Type | Best for | Pros | Trade-offs | Example models |
|---|---|---|---|---|
Bluetooth selfie stick | Group shots, distance triggering | No cable clutter; works on most phones | Needs charging; occasional pairing quirks | DJI OM Fill Light Phone Clamp (as a phone holder + remote style), Insta360 setups with Bluetooth remotes |
Wired (3.5mm) selfie stick | Simple, no-battery setups | No charging; instant trigger | Phone jack/dongle dependency | UBeesize wired variants |
Foldable/pocket tripod stick | Travel, day bag carry | Light; quick deploy | Less stable in wind/crowds | Xiaomi Mi Selfie Stick Tripod (compact style) |
Heavy-duty tripod-base stick | Video, time-lapse, solo content | Stable; better tilt control | Heavier; bulkier | JOBY GripTight PRO TelePod, UBeesize Tripod Selfie Stick |
Practical tips for travel, events, and outdoor activities
When I’m packing a selfie stick for travel, I keep it simple: the stick, a phone clamp (if it’s removable), and a microfiber cloth in a small zip pouch. I skip heavy full-size tripods and extra adapters unless I know I’ll use them. If I’m flying, I collapse it fully, lock the sections, and tuck it into my carry-on so it doesn’t snag and extend in my bag.
Pack light, protect the essentials
I bring the selfie stick, a small zip pouch, and a thin microfiber cloth; I leave bulky full-size tripods and extra mounts at home. If I’m flying, I keep it in my carry-on and collapse/lock the sections so it can’t extend in the bag.
Dial in phone settings for the scene
Concerts: switch to 2x/3x (if available), enable HDR (or “Smart HDR”), and lock exposure slightly down to protect highlights. Hikes: use 0.5x ultra-wide for scenery, turn on gridlines + level, and shoot in HEIF/RAW (if supported) for later edits. Beaches/snow: tap to focus on faces, lower exposure a notch, and use a lens wipe often to remove salt/spray.
Use safe, respectful reach
I keep the stick below shoulder height in crowds, stay aware of people behind me, and avoid swinging it. I never block aisles, ADA paths, or emergency access.
Know the venue and local rules
I check the event FAQ—many arenas ban “monopods/selfie sticks,” even if small. In parks and historic sites, I watch for signage around cliffs, wildlife areas, and restricted viewpoints.
Add small accessories that matter
A wrist strap prevents drops, a pocket mini tripod helps for group shots/timelapses, and a slim 10,000 mAh power bank keeps Bluetooth and camera use from draining my phone during long days.
My quick accessories kit
Wrist strap (or lanyard) so a bumped arm doesn’t mean a cracked screen.
Mini tripod like a Joby GorillaPod 1K (or any pocket tripod) for group shots and time-lapses.
Power bank like an Anker PowerCore 10000 plus a short USB-C/Lightning cable for all-day filming.
Finally, I treat my selfie stick like a “polite extension” of my arm: slow movements, tight spaces = keep it short, and if someone looks uncomfortable, I change angles or put it away. That mindset keeps my photos (and my day) drama-free.
Maintenance, pairing, and troubleshooting
A little care keeps my selfie stick extending smoothly and holding my phone securely. I treat the telescopic pole like a camera lens: clean, dry, and protected from grit that can grind into the sections.
Quick care vs quick fixes
Care & storage for a telescopic selfie stick
Keep the pole, phone holder, and locks clean and protected so extension stays smooth and clamps grip safely.
- • Wipe the telescopic sections with a microfiber cloth; use 70% isopropyl alcohol on the phone holder pads, then dry fully.
- • Avoid sand/saltwater; if exposed, extend fully and rinse with fresh water, dry, then apply a tiny amount of silicone spray to the joints (not the clamp pads).
- • Store collapsed with the knob/flip locks loosened; don’t leave it compressed under heavy items in a backpack.
Bluetooth remote pairing & quick fixes
Most issues come from low battery, wrong Bluetooth target, or mechanical wear in the clamp/hinges.
- • Pairing fails: charge the remote, forget the device in iOS/Android Bluetooth, then re-pair (often shows as “AB Shutter3” or similar).
- • Loose clamp/wobble: tighten the phone holder screw, add a thin rubber shim, and keep the phone centered over the pole.
- • Replace vs repair: swap the remote (CR1632/USB models), replace worn pads, but retire the stick if the pole twists, locks slip, or a hinge cracks.
For battery care on USB-rechargeable remotes, I avoid leaving it plugged in overnight and top up before trips. If I use a coin-cell remote, I pull the battery if it’ll sit unused for months.
If the stick starts wobbling even after tightening, or the flip-lock won’t hold extension, I replace the phone holder or retire the stick—especially if there’s any crack in the hinge or the pole has a twist that could drop my iPhone or Samsung Galaxy.
Frequently Asked Questions
If I’m buying a practical, versatile selfie stick, these are the checks I make before I hit “add to cart.” Small details—mount size, remote range, and load rating—decide whether it’s a daily carry or a drawer item.
FAQ: Compatibility, Remote Range, and Load Limits
Is it compatible with my smartphone? ▼
How far can the Bluetooth remote work, and how long does the battery last? ▼
Can it support action cameras or heavier phones—what’s the max load? ▼
When I’m unsure, I check for a standard 1/4"-20 screw and a stated payload rating, then test with my phone case on—especially if I use a PopSockets grip or a MagSafe ring.
Conclusion
Practical and versatile selfie stick, perfect for taking photos and recording videos on any occasion. Featuring an adjustable telescopic pole, it provides extended reach to capture the perfect angles and include more people in your shots. The smartphone holder is universal and compatible with most devices. With its integrated or detachable Bluetooth remote, you can easily take pictures from a distance. Lightweight and compact, it’s ideal for travel, events, and outdoor activities.
🎯 Key takeaways
- → A telescopic, lightweight selfie stick with a universal phone holder makes group shots, travel photos, and steady video far easier.
- → Use the integrated/detachable Bluetooth remote to trigger photos hands-free—great for solo creators, family trips, and outdoor activities.
- → Next step: confirm your phone fits the clamp, pair the remote once, and practice a few angles before your next event.
My next step is simple: I’ll pair the Bluetooth remote, tighten the phone clamp, then test a few heights and angles for portraits, group shots, and stable video. If I’m traveling, I’ll pack it in an easy-access pocket so it’s ready for quick memories.